Attention: Here be dragons
This is the latest
(unstable) version of this documentation, which may document features
not available in or compatible with released stable versions of Godot.
Checking the stable version of the documentation...
Lire des vidéos
Godot supporte la lecture de vidéos avec le nœud VideoStreamPlayer.
Formats de lecture pris en charge
The only supported format in core is Ogg Theora (not to be confused with Ogg Vorbis audio) with optional Ogg Vorbis audio tracks. It's possible for extensions to bring support for additional formats.
Les normes H.264 et H.265 ne peuvent pas être supportées par le noyau Godot, ceux-ci étant des technologies brevetées. AV1 est libre de droit, mais reste lent à décoder sur le CPU et le support du décodage matériel n'est pas encore disponible sur tous les GPUs utilisés aujourd'hui.
WebM was supported in core in Godot 3.x, but support for it was removed in 4.0 as it was too buggy and difficult to maintain.
Note
You may find videos with a .ogg or .ogx extensions, which are generic
extensions for data within an Ogg container.
Renommer ces extensions de fichiers en .ogv peut permettre à ces vidéos d'être importées dans Godot. Cependant, tous les fichiers avec des extensions .ogg ou .ogx ne sont pas forcément des vidéos - certaines d'entre elles peuvent ne contenir que de l'audio.
Setting up VideoStreamPlayer
Create a VideoStreamPlayer node using the Create New Node dialog.
Select the VideoStreamPlayer node in the scene tree dock, go to the inspector and load a
.ogvfile in the Stream property.Si vous n'avez pas encore votre vidéo en format Ogg Theora, consultez Paramètres recommandés pour l'encodage Theora.
If you want the video to play as soon as the scene is loaded, check Autoplay in the inspector. If not, leave Autoplay disabled and call
play()on the VideoStreamPlayer node in a script to start playback when desired.
Gérer le redimensionnement et différents rapports d'aspect
By default, the VideoStreamPlayer will automatically be resized to match the video's resolution. You can make it follow usual Control sizing by enabling Expand on the VideoStreamPlayer node.
To adjust how the VideoStreamPlayer node resizes depending on window size, adjust the anchors using the Layout menu at the top of the 2D editor viewport. However, this setup may not be powerful enough to handle all use cases, such as playing fullscreen videos without distorting the video (but with empty space on the edges instead). For more control, you can use an AspectRatioContainer node, which is designed to handle this kind of use case:
Ajoutez un nœud AspectRatioContainer. Vérifiez que ce ne soit pas l'enfant d'un autre nœud conteneur. Sélectionnez le nœud AspectRatioContainer, puis réglez sa Disposition en haut de l'éditeur 2D à Rectangle complet. Réglez le Ratio dans le nœud AspectRatioContainer afin qu'il corresponde aux proportions de la vidéo. Vous pouvez utiliser des formules mathématiques dans l'inspecteur pour vous aider. Souvenez-vous de faire en sorte qu'une des opérandes soit un flottant. Sinon, le résultat de la division sera toujours un entier.
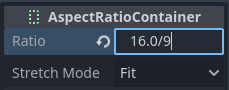
Ce sera évalué à (approximativement) 1.777778
Once you've configured the AspectRatioContainer, reparent your VideoStreamPlayer node to be a child of the AspectRatioContainer node. Make sure Expand is enabled on the VideoStreamPlayer. Your video should now scale automatically to fit the whole screen while avoiding distortion.
Voir aussi
Voir Résolutions multiples pour plus d'informations sur le support de plusieurs rapports d'aspect dans votre projet.
Afficher une vidéo sur une surface 3D
En utilisant un nœud VideoStreamPlayer comme enfant d'un nœud SubViewport, il est possible d'afficher n'importe quel nœud 2D sur une surface 3D. Par exemple, cela peut être utilisé pour afficher des billboards animés quand l'animation trame par trame nécessiterait trop de mémoire.
Ceci peut être fait avec les étapes suivantes :
Créez un nœud SubViewport. Réglez sa taille pour qu'il corresponde à la taille de votre vidéo en pixels.
Create a VideoStreamPlayer node as a child of the SubViewport node and specify a video path in it. Make sure Expand is disabled, and enable Autoplay if needed.
Créez un nœud MeshInstance3D avec une ressource PlaneMesh ou QuadMesh dans la propriété Mesh. Redimensionnez le maillage pour qu'il corresponde au format de la vidéo (sinon, celle-ci apparaîtra déformée).
Create a new StandardMaterial3D resource in the Material Override property in the GeometryInstance3D section.
Activez Local à la scène dans la section Ressource du StandardMaterial3D (en bas). Cela est requis avant que vous puissiez utiliser une ViewportTexture dans sa propriété Texture Albedo.
In the StandardMaterial3D, set the Albedo > Texture property to New ViewportTexture. Edit the new resource by clicking it, then specify the path to the SubViewport node in the Viewport Path property.
Enable Albedo Texture Force sRGB in the StandardMaterial3D to prevent colors from being washed out.
If the billboard is supposed to emit its own light, set Shading Mode to Unshaded to improve rendering performance.
Voir Utilisation des Viewports et la démo de GUI en 3D pour plus d'informations sur la mise en place.
Faire boucler une vidéo
For looping a video, the Loop property can be enabled. This will seamlessly restart the video when it reaches its end.
Note that setting the project setting Video Delay Compensation to a non-zero value might cause your loop to not be seamless, because the synchronization of audio and video takes place at the start of each loop causing occasional missed frames. Set Video Delay Compensation in your project settings to 0 to avoid frame drop issues.
Conditions de décodage vidéo et résolutions recommandées
Le décodage vidéo est exécuté dans le CPU, car les GPUs n'ont pas d'accélération matérielle pour décoder les vidéos Theora. Les CPU d'ordinateurs modernes décodent les vidéos Ogg Theora en 1440p à 60 FPS ou plus, cependant les CPUs bas de gamme auront plus de mal avec les vidéos haute résolution.
Pour s'assurer que vos vidéos se décodent sans problème sur tout type de matériel :
Lorsque vous développez des jeux pour des plateformes de bureau, il est recommandé d'encoder en 1080p au maximum (de préférence à 30 IPS). La plupart des gens utilisent encore des écrans à résolution 1080p ou inférieure, et l'encodage de vidéos à plus haute résolution ne vaut pas forcément la peine d'augmenter la taille du fichier et les exigences du processeur.
Lorsque vous développez des jeux pour des plateformes mobiles ou web, il est recommandé d'encoder en 720p au maximum (de préférence à 30 IPS ou même moins). La différence visuelle entre les vidéos 720p et 1080p sur un appareil mobile n'est généralement pas très marquée.
Limites de la lecture
There are some limitations with the current implementation of video playback in Godot:
Le streaming d'une vidéo à partir d'une URL n'est pas prise en charge.
Only mono and stereo audio output is supported. Videos with 4, 5.1 and 7.1 audio channels are supported but down-mixed to stereo.
Paramètres recommandés pour l'encodage Theora
Un conseil : évitez de vous fier aux exportateurs Ogg Theora intégrés (la plupart du temps). Il y a deux raisons pour lesquelles vous pouvez préférer l'utilisation d'un programme externe pour encoder votre vidéo :
Certains programmes tels que Blender peuvent effectuer un rendu en Ogg Theora. Cependant, les préréglages de qualité par défaut sont généralement très bas par rapport aux normes actuelles. Vous pouvez peut-être augmenter les options de qualité dans le logiciel que vous utilisez, mais la qualité de sortie risque de ne pas être idéale (compte tenu de la taille accrue du fichier). Cela signifie généralement que le logiciel ne prend en charge que l'encodage à débit binaire constant (CBR), au lieu du débit binaire variable (VBR). L'encodage VBR est préférable dans la plupart des cas, car il offre un meilleur rapport qualité/taille de fichier.
Certains autres programmes ne peuvent pas du tout effectuer le rendu en Ogg Theora.
Dans ce cas, vous pouvez rendre la vidéo dans un format intermédiaire de haute qualité (comme une vidéo H.264 à haut débit) puis la réencoder en Ogg Theora. Idéalement, vous devriez utiliser un format sans perte ou non compressé comme format intermédiaire pour maximiser la qualité de la vidéo Ogg Theora de sortie, mais cela peut nécessiter beaucoup d'espace disque.
FFmpeg (CLI) is a popular open source tool for this purpose. FFmpeg has a steep learning curve, but it's a powerful tool.
Here are example FFmpeg commands to convert an MP4 video to Ogg Theora. Since FFmpeg supports a lot of input formats, you should be able to use the commands below with almost any input video format (AVI, MOV, WebM, …).
Note
Assurez-vous que votre copie de FFmpeg est compilée avec le support de libtheora et libvorbis. Vous pouvez vérifier cela en exécutant ffmpeg sans aucun argument, puis en regardant la ligne configuration: dans la sortie de la commande.
Avertissement
Current official FFmpeg releases have some bugs in their Ogg/Theora multiplexer. It's highly recommended to use one of the latest static daily builds, or build from their master branch to get the latest fixes.
On Windows, make sure to use 32-bit builds of FFmpeg. Windows 64-bit builds have known issues with Theora encoding, which result in artifacts in the output file.
Équilibrer la qualité et la taille des fichiers
Le niveau de qualité de la vidéo (-q:v) doit être compris entre 1 et 10. La qualité 6 est un bon compromis entre la qualité et la taille du fichier. Si vous encodez à une haute résolution (comme 1440p ou 4K), vous voudrez probablement diminuer -q:v à 5 pour garder une taille de fichier raisonnable. La densité de pixels étant plus élevée sur une vidéo 1440p ou 4K, les préréglages de qualité inférieure à des résolutions plus élevées auront un aspect aussi bon, voire meilleur, que les vidéos à basse résolution.
Le niveau de qualité audio (-q:a) doit être compris entre -1 et 10. La qualité 6 offre un bon compromis entre la qualité et la taille du fichier. Contrairement à la qualité vidéo, l'augmentation de la qualité audio n'augmente pas autant la taille du fichier de sortie. Par conséquent, si vous voulez le son le plus propre possible, vous pouvez augmenter cette qualité à 9 pour obtenir un son perçu comme sans perte. Ceci est particulièrement utile si votre fichier d'entrée utilise déjà une compression audio avec perte. Une plus haute qualité audio augmente l'utilisation du CPU par le décodeur, et peut donc mener à des pertes de l'audio en cas de forte charge du système. Voir cette page pour un tableau listant les préréglages de qualité audio Ogg Vorbis et leurs débits variables respectifs.
The GOP (Group of Pictures) size (-g:v) is the max interval between
keyframes. Increasing this value can improve compression with almost no impact
on quality. The default size (12) is too low for most types of content,
it's therefore recommended using higher GOP values before reducing video
quality. Compression benefits will fade away as the GOP size increases though.
Values between 64 and 512 usually give the best compression.
Note
Higher GOP sizes will increase max seek times with a sudden increase when
going beyond powers of two starting at 64. Max seek times with GOP size
65 can be almost twice as long as with GOP size 64, depending on
decoding speed.
FFmpeg : Convertissez en préservant la résolution vidéo d'origine
La commande suivante convertit la vidéo tout en conservant sa résolution d'origine. Le débit binaire de la vidéo et de l'audio sera variable pour maximiser la qualité tout en économisant de l'espace dans les parties de la vidéo/audio qui ne nécessitent pas un débit binaire élevé (comme les scènes statiques).
ffmpeg -i input.mp4 -q:v 6 -q:a 6 -g:v 64 output.ogv
FFmpeg : Redimensionner la vidéo puis la convertir
La commande suivante permet de redimensionner une vidéo pour qu'elle ait une taille de 720 pixels (720p), tout en préservant son rapport hauteur/largeur existant. Cela permet de réduire considérablement la taille du fichier si la source est enregistrée à une résolution supérieure à 720p :
ffmpeg -i input.mp4 -vf "scale=-1:720" -q:v 6 -q:a 6 -g:v 64 output.ogv
Clé Chroma de vidéos
Chroma key, commonly known as the "green screen" or "blue screen" effect, allows you to remove a specific color from an image or video and replace it with another background. This effect is widely used in video production to composite different elements together seamlessly.
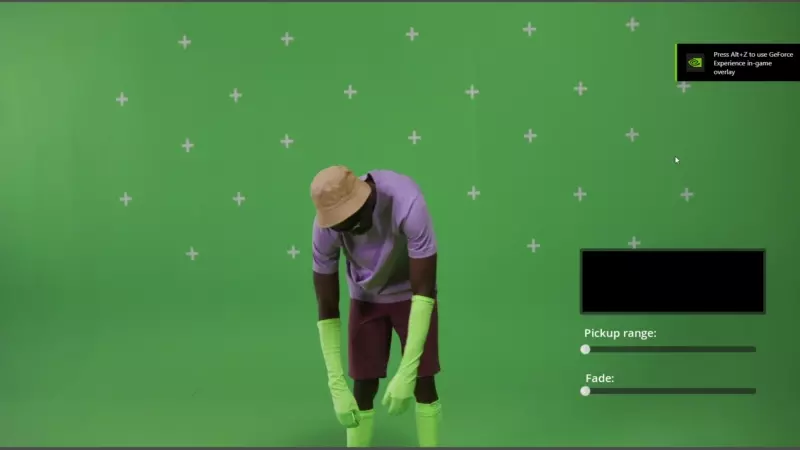
We will achieve the chroma key effect by writing a custom shader in GDScript and using a VideoStreamPlayer node to display the video content.
Configuration de la scène
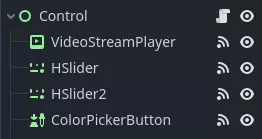
Ensure that the scene contains a VideoStreamPlayer node to play the video and a Control node to hold the UI elements for controlling the chroma key effect.
Writing the Custom Shader
To implement the chroma key effect, follow these steps:
Sélectionnez le nœud VideoStreamPlayer dans la scène et allez à ses propriétés. Sous CanvasItem > Matériau, créez un nouveau shader nommé "ChromaKeyShader.gdshader."
Dans le fichier "ChromaKeyShader.gdshader", écrivez le code de shader personnalisé comme montré ci-dessous :
shader_type canvas_item;

// Uniform variables for chroma key effect
uniform vec3 chroma_key_color : source_color = vec3(0.0, 1.0, 0.0);
uniform float pickup_range : hint_range(0.0, 1.0) = 0.1;
uniform float fade_amount : hint_range(0.0, 1.0) = 0.1;

void fragment() {
    // Get the color from the texture at the given UV coordinates
    vec4 color = texture(TEXTURE, UV);

    // Calculate the distance between the current color and the chroma key color
    float distance = length(color.rgb - chroma_key_color);

    // If the distance is within the pickup range, discard the pixel
    // the lesser the distance more likely the colors are
    if (distance <= pickup_range) {
        discard;
    }

    // Calculate the fade factor based on the pickup range and fade amount
    float fade_factor = smoothstep(pickup_range, pickup_range + fade_amount, distance);

    // Set the output color with the original RGB values and the calculated fade factor
    COLOR = vec4(color.rgb, fade_factor);
}
The shader uses the distance calculation to identify pixels close to the chroma key color and discards them, effectively removing the selected color. Pixels that are slightly further away from the chroma key color are faded based on the fade_factor, blending them smoothly with the surrounding colors. This process creates the desired chroma key effect, making it appear as if the background has been replaced with another image or video.
The code above represents a simple demonstration of the Chroma Key shader, and users can customize it according to their specific requirements.
UI Controls
To allow users to manipulate the chroma key effect in real-time, we created sliders in the Control node. The Control node's script contains the following functions:
 extends Control

 func _on_color_picker_button_color_changed(color):
     # Update the "chroma_key_color" shader parameter of the VideoStreamPlayer's material.
     $VideoStreamPlayer.material.set("shader_parameter/chroma_key_color", color)

 func _on_h_slider_value_changed(value):
     # Update the "pickup_range" shader parameter of the VideoStreamPlayer's material.
     $VideoStreamPlayer.material.set("shader_parameter/pickup_range", value)

 func _on_h_slider_2_value_changed(value):
     # Update the "fade_amount" shader parameter of the VideoStreamPlayer's material.
     $VideoStreamPlayer.material.set("shader_parameter/fade_amount", value)

func _on_video_stream_player_finished():
     # Restart the video playback when it's finished.
     $VideoStreamPlayer.play()
using Godot;

public partial class MyControl : Control
{
    private VideoStreamPlayer _videoStreamPlayer;

    public override void _Ready()
    {
        _videoStreamPlayer = GetNode<VideoStreamPlayer>("VideoStreamPlayer");
    }

    private void OnColorPickerButtonColorChanged(Color color)
    {
        // Update the "chroma_key_color" shader parameter of the VideoStreamPlayer's material.
        _videoStreamPlayer.Material.Set("shader_parameter/chroma_key_color", color);
    }

    private void OnHSliderValueChanged(double value)
    {
        // Update the "pickup_range" shader parameter of the VideoStreamPlayer's material.
        _videoStreamPlayer.Material.Set("shader_parameter/pickup_range", value);
    }

    private void OnHSlider2ValueChanged(double value)
    {
        // Update the "fade_amount" shader parameter of the VideoStreamPlayer's material.
        _videoStreamPlayer.Material.Set("shader_parameter/fade_amount", value);
    }

    private void OnVideoStreamPlayerFinished()
    {
        // Restart the video playback when it's finished.
        _videoStreamPlayer.Play();
    }
}
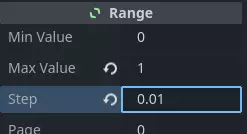
also make sure that the range of the sliders are appropriate, our settings are :
Signal Handling
Connect the appropriate signal from the UI elements to the Control node's script. you created in the Control node's script to control the chroma key effect. These signal handlers will update the shader's uniform variables in response to user input.
Save and run the scene to see the chroma key effect in action! With the provided UI controls, you can now adjust the chroma key color, pickup range, and fade amount in real-time, achieving the desired chroma key functionality for your video content.